
Exterior Waterproofing
EXTERIOR WATERPROOFING
HOW DOES IT WORK?
Exterior waterproofing of the below-ground foundation can be described as a multi-step process that combines several crucial tasks. This includes applying waterproofing materials directly onto the foundation surface and installing an underground drainage system. Together, these steps create a fully water-resistant foundation barrier and effectively redirect groundwater away from the building. This approach helps protect the foundation from moisture damage and ensures long-term structural stability.
There is more to exterior waterproofing than just the process itself, however. Homeowners must also understand that each house (and therefore each foundation) is unique, and an individual approach towards every building is not just a motto - it's a necessity. Let's take a look at some different foundations.

Cinder Block/Concrete Block Foundations


A cinder block foundation after it has been restored with hydraulic cement. This condition of the wall is now suitable for further waterproofing procedures.
A cinder block foundation after it has been exposed. With this condition of the wall, waterproofing material application will not be effective. Restoration of the wall is necessary.
Cinder block (or concrete block) foundations are commonly found all around the GTA Area. This material is used more often in older buildings, although foundation walls of newer houses can be constructed from cinder blocks as well.
Depending on the age of the building and the condition of the foundation walls, cinder blocks may need additional masonry restoration work prior to the waterproofing installation procedures. Specifically, there may be erosion of the concrete blocks themselves or the mortar joints in between. Cracks in the foundation due to the age of the building are also a frequent sight upon the exposure of older cinder block foundations.
Due to the nature of this building material, foundations constructed from cinder blocks are essentially "hollow" inside.
Once below ground water finds its way through the eroded mortar joints and/or foundation cracks, it will travel down the
cinder blocks until it reaches the footings, resulting in dampness and then moisture accumulating at the bottom of the basement wall.
Thus, an old cinder block foundation needs to be repaired by means of hydraulic cement application before it can be waterproofed. At AEGIS Waterproofing Inc., we provide and include this service as a part of the waterproofing project.

An unparged cinder block foundation.

Parged cinder block foundation with the footings visible.
Brick Foundation
Regularly found as foundation material in older houses
all around Toronto and Greater Toronto Area, brick is versatile and durable, lasting in good condition for an exceptionally long time and proving itself as a reliable solution for its load bearing capabilities.
Usually such foundations are made up of multiple layers of bricks that are joined together with mortar. This combination creates a sturdy wall designed to bear the weight of the building constructed above it. Each layer is carefully aligned and bonded to ensure stability and strength, making brick foundations a reliable base in construction. However, due to age and environment, brick foundations are frequently found in a deteriorated and moisture saturated condition.
Bricks are naturally porous, which means they can soak up water if they aren’t properly sealed. Over time, this moisture can seep inside the home, potentially causing damage to the interior, promoting mold growth, and weakening the mortar that holds the bricks together.
Moisture can also result in efflorescence—a white, powdery substance that appears on brick surfaces, signaling that water is traveling through the foundation.
In colder climates, trapped water within bricks can freeze and expand, leading to spalling. This process causes the outer brick layer to flake or peel off, affecting both the integrity of the foundation and the appearance of the house.
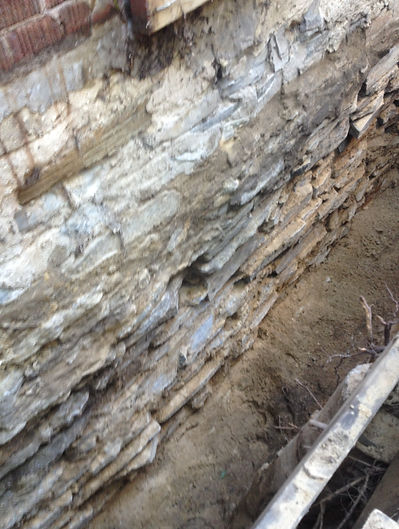
Soil absorbs and holds vast volumes of underground water that can also permeate the foundation walls. Brick is not designed to resist such constantly damp environment and - after many years, it will start to erode - as seen on these photographs.

The same eroded brick foundation wall has been restored with hydraulic cement and is now ready for waterproofing material application.

After decades of erosion, an old brick foundation may look
like its falling apart.

But after restoration work with hydraulic cement, a brick foundation becomes absolutely ready for waterproofing material application.

Despite its reliability, time takes its toll - regular brick is ill-suited as building material for below ground application when it comes to water resistance capabilities. Nevertheless, older houses in Toronto were often made with brick foundations.

Fieldstone Foundation
Fieldstone foundations - because of their age - usually
need considerable restoration work. It is not uncommon to see individual stones simply fall out from the foundation wall due to erosion of the mortar joints.
.jpeg)
Waterproofing material installation onto such a wall is
completely out of question. This foundation needs substantial amount of cement work prior to waterproofing.
Fieldstone foundations, an ordinary sight when it comes to older buildings, are made by stacking natural stones with mortar or with minimal binding material. While visually charming and historically significant, these foundations have notable drawbacks. Their age often means they are prone to deteriorating, shifting, or bowing over time, compromising the building’s structural integrity. Additionally, they usually lack proper drainage systems, causing water to accumulate and saturate the foundation. This moisture will lead to issues like mold and interior dampness. Without modern waterproofing and drainage solutions, fieldstone foundations are vulnerable to damage from frost and soil movement. For these reasons, while fieldstone foundations add rustic appeal, they may require frequent inspections and maintenance to ensure long-term stability and dryness.
Restoration of fieldstone foundations is possible, albeit expensive due to the significant amount of work that is required to make the fieldstone suitable for waterproofing material application. An another issue with fieldstone is such foundations rarely have a clay weeping tile drainage system - and if they do - it is usually clogged with soil, roots and debris due to the age of the building. Therefore, homeowners that wish to waterproof their fieldstone foundations must be aware that there is significant masonry work involved and newly installed weeping tiles need to be connected into a proper drainage source (such as a sump pump basin).

Even a fieldstone foundation - despite its asymmetrical surface - may be parged, restored and brought into a condition that is sufficient enough to be effectively waterproofed.

Once a moldy, moisture saturated, deteriorating fieldstone wall has been restored with hydraulic cement, waterproofed and provided with proper weeping tiles for drainage.
Poured Concrete Foundation

Monolithic and durable by nature, poured concrete foundations can still crack however, oftentimes after the house has settled. Underground water can and will easily find its way through such cracks since it can't travel elsewhere.

For various reasons, even new houses with poured concrete foundations often have clogged or broken weeping tiles, as seen on this photo. When drainage is damaged or outright non-functional, water will still accumulate at the bottom of the footings, seeping into the basement over time - even if the foundation itself is completely fine.

Foundation sealants for poured concrete also require foundation membranes (DELTA-MS is shown on the photo), and weeping tiles for proper drainage.
Poured concrete foundations are a popular choice in construction due to their excellent durability and longevity when it comes to the structural integrity of a building.
Made by pouring liquid concrete into forms on-site, they create a solid base that supports buildings effectively. Their seamless design helps distribute weight evenly, making them resistant to shifting and heavy loads over time.
However, despite their robustness, poured concrete foundations can still be prone to cracking, especially during the settlement phase when the building and soil beneath it adjust and settle. These cracks are usually minor but need monitoring to prevent more significant structural issues. Overall, as a building material, poured concrete offers a reliable and long-lasting foundation that usually demands significantly less restoration work before waterproofing treatment can be applied.
With this taken taken into consideration, homeowners must be aware that houses built with poured concrete often feature deeper basements compared to other construction methods. This depth offers extra comfort in terms of higher ceilings but also brings challenges, especially when it comes to waterproofing.
Deeper basements are more prone to water infiltration due to increased soil pressure and groundwater levels pressing against the walls and floor. As a result, waterproofing these spaces requires more effort and careful planning. Techniques like installing high-quality drainage systems, applying durable waterproofing membranes, and using proper sealants become essential to keep the basement dry and safe.
While poured concrete provides strong, solid walls, deeper basement design means builders and homeowners must pay close attention to waterproofing to protect the structure from moisture damage and ensure a comfortable environment for the basement living space.

Just as with any other foundation, poured concrete needs liquid rubber sealant for waterproofing (In this case, Aqua-Block 770-06)

Disadvantages of a basement that has not been waterproofed
Every homeowner who has dealt with moisture, dampness, and mold in their basement has likely wondered: How serious is a leaky basement? What impact does water have on my house? Are there hidden risks for both my health and the overall soundness of my home? If these concerns sound familiar, you're not alone—these questions are completely reasonable and understandable for anyone facing water problems in their basement.

If left unwaterproofed, the hollow nature of cinder block leads to
water accumulating in different parts of the basement, even if water is coming through in one specific area.

Houses built on fieldstone foundations are very old and the basement area inside these houses was never intended to be used as living space. As such, they were built without proper foundation drainage and are usually saturated with moisture after all this time. Pinpointing where exactly water is coming in the basement is essentially impossible when it comes to fieldstone, and usually, at least one wall (if not the entire house) needs to be waterproofed entirely.

Mold, "flaking" and white chalky substance left after water evaporation are all common signs of a brick foundation that is in need of waterproofing.

Despite being arguably the most reliable out of the four foundation types, poured concrete can still suffer from foundation cracks after the building settles. This is usually the main reason when it comes to water damage inside the basement, the other reason being clogged weeping tiles. Even poured concrete foundations need both reliable waterproofing treatment and proper drainage for a dry environment inside the basement.
Here are some important things to consider as a homeowner with a basement that has water damage:

Water seepage causes dampness, which in turn leads to mold and mildew growth. Mold can be harmful and poses health risks by triggering allergies and respiratory issues.
Excess moisture can often result in unpleasant odors, making the living space inside the basement area less comfortable or possibly even unsuitable.
Constant, ongoing water infiltration can weaken the building foundation over time, affecting the structural integrity of the house and resulting in costly repairs.
A permanently wet basement can attract pests such as insects and rodents, creating additional headaches for the homeowner.
Failing to properly waterproof a property can significantly reduce its market value and diminish its attractiveness to potential buyers.
Electrical systems and appliances located in a damp basement are also at risk of damage or malfunction.
To effectively resolve the above mentioned issues, basement waterproofing is absolutely essential. Protect your home’s foundation by entrusting our experienced team with your basement waterproofing needs. As experts, we will ensure your basement remains dry and secure, strengthening your home’s overall stability and preventing costly damage from moisture. Don’t wait for problems to worsen—take action now and fortify your foundation.
Exterior Waterproofing: How Does it Work?
Up to this point, we have briefly described various types of foundation walls and the problems caused by a leaky basement. Next, we will focus on answering the most important question that homeowners have—How does exterior waterproofing actually work, what are the different steps and just how exactly does this process look like? Let's begin.
1. After a free, on-site evaluation, we will identify the precise cause of the leak in your basement. Accurately
pinpointing where the water is coming from is crucial because this will determine both the most effective
waterproofing method and the overall cost to resolve the problem.

2. Preparation for the waterproofing project is just as important as the evaluation of the job itself. Every house has
underground installations such as gas and hydro lines, water sprinkler systems, electrical lines, etc. At Aegis
Waterproofing Inc., we take responsibility for contacting Ontario One Call and getting the locates for below
ground infrastructure. This way, our specialists will ensure that critical property such as gas lines are not
damaged during the excavation process.

A Gas and Hydro line are clearly visible on this photo along with waterproofing material application that is underway.

An orange gas line along with a downspout drain line are visible in the trench. Waterproofing installation has been completed and the trench is ready to be backfilled.
3. Prior to the excavation process, any obstacles adjacent to the house have to be temporarily removed or
demolished. This includes but is not limited to: concrete pathways, interlock, wooden decks, asphalt, trees
and various types of vegetation. Exterior waterproofing requires open space in order to expose the
foundation down to the footings. After waterproofing has been completed, most of the mentioned objects may be placed or installed back again.

On this photo, we can see an example of a concrete pathway that has been carefully demolished prior to the start of the waterproofing project.

Construction bins are often called in for concrete, asphalt and debris removal due to the vast volume of the demolished material. Very often, before the waterproofing project starts, it is essentially preceded by a demolition project.
4. The excavation stage follows as an essential part of exterior waterproofing, allowing access to the outside of
the foundation wall for applying waterproofing materials. It’s crucial to uncover the entire foundation wall
down to the footings to ensure proper waterproofing material application. All the soil removed during
excavation is kept close by, ready to be used later for backfilling after the waterproofing work has been
completed.
Several factors influence how challenging this process can be, such as the foundation’s depth, limited
access to the site, and the presence of underground utilities. These challenges not only affect the complexity
of the work but also impact the overall cost of the waterproofing project.

The excavation process has been completed, the foundation footings are visible at the bottom of the wall and the old clay weeping tiles have been removed.

The footings are already visible on this photo, but the excess soil needs to be dug out and the wall needs to be cleaned before waterproofing can commence.
5. The next step is related to the restoration of the building foundation and may or may not be necessary
depending on the type and the condition of the foundation wall. Brick and fieldstone foundations
always need to be restored with hydraulic cement, whereas cinder block and poured concrete require
hydraulic cement repairs only in case of cracks and other significant indicators of damage. Otherwise, a
foundation wall is suitable for waterproofing material application.

This cinder block foundation was in need of parging work prior to the application of waterproofing materials.

The footings are also parged along with the foundation wall, leading to maximum restoration quality.
5. Once the foundation is properly prepared, a water-resistant sealer can be applied to the wall. There are many
brands and types of sealants available on the market. At AEGIS Waterproofing Inc., we commonly use Bakor
Aqua-Bloc 720-38 and Aqua-Bloc 770-06 to seal and fully waterproof the foundation. Other effective options
include Blueskin and "Liquid Rubber" Foundation Sealant, which are also suitable alternatives. After the
waterproofing sealant has fully cured, the foundation is ready for the next step in exterior waterproofing to
ensure lasting protection against moisture.

Aqua-Bloc (in this case, Aqua-Bloc 720-38) performs the primary function of a water resistant barrier, with the DELTA-MS Foundation Membrane being a material that is used for drainage.

Aqua-Bloc 770-06 may be applied even in harsh, cold winter conditions.
6. After the application of the foundation sealant has been finished and the material has cured, the next step in exterior waterproofing is the installation of the foundation membrane. At AEGIS Waterproofing Inc., we use the DELTA-MS Foundation Wrap membrane that is primarily designed for drainage. The dimpled design of the membrane forms a gap of air between the soil and the foundation wall, which helps water flow down to the perforated drain (weeping tiles) that is located beside the footings of the foundation wall. This feature not only directs water away but also stops hydrostatic pressure from building up and causing damage to the foundation.
The DELTA-MS Foundation Board is installed by means of fasteners and mouldings that are secured with special Tapcon concrete screws.

This is how the DELTA-MS Foundation Wrap looks like after it has been installed onto the foundation wall. The next step is the installation of weeping tiles for drainage.

The weeping tiles wrapped in filtration fabric have been
installed beside the foundation membrane, but gravel has not been placed yet.
6. With the foundation being restored, sealed with waterproofing coating and provided with a drainage
membrane, the time has come for the last step before backfilling can commence. It is now crucial to install
weeping tiles for drainage, because even a waterproofed foundation needs to divert moisture away from the house.
Weeping tiles are essentially perforated plastic pipes that collect water which accumulates in the soil. If such
pipes are not present at the bottom of the footings, even a waterproofed foundation might not be enough to
stop below ground water, and it may push from underneath the basement floor and not the foundation walls.
Weeping tiles need to be tied into a proper drainage source. Usually, this is a sump pump basin inside the
basement service area. Alternatively, if the original weeping tile system was in a fair condition, new weeping
tiles may be installed into the original weeping tiles that are in turn connected into the storm drain line.
After the weeping tiles have been installed, it is vitally important to place enough gravel on top of them in
order to keep any soil from clogging the system. Additional filter cloth fabric may also be placed on top
of the gravel before backfilling the trench with soil.


On both photos, the weeping tile is covered with 3/4" crushed stone (gravel) for filtration purposes. A layer of gravel prevents soil from clogging the drainage system, keeping it functional for decades to come.
7. The waterproofing project is nearing its completion. With the foundation being restored, waterproofed and
with proper drainage being installed and covered with gravel, the original excavated soil can now be
backfilled. Depending on the type of soil, a compacting machine may or may not be required. Thuswise,
sandy soil will go back in the trench without the need of compacting machinery (jumping jack), whereas clay
soil will need to be tamped in order to go back inside the trench. If not compacted properly, the excess soil
will remain at the waterproofing site and will require a bin to be taken out to the junkyard for disposal.
Once the soil has been backfilled and compacted, our team will ensure that the project site is clean and tidy -
the project has been finished.


A proper cleanup of soil and dust are a part of every waterproofing project. Once the soil settles a little bit more, the interlocking can be placed back.
Compacting the excavated soil is an important part of the backfilling process. If clay is left untamped, there will be leftover soil that needs to be placed in bins instead.
